Minimum
requirements of the test procedure include three (3) distinct network elements,
each with their own power and management interfaces. All three nodes must be equipped to provide
client access in the form of OC-12, OC-48, OC-192, & Gigabit Ethernet interfaces, however one node must also be capable of
providing OADM functions for one test scenario.
Please see Section 5 of this test procedure for a detailed diagram.
The
following represents the total number of client interfaces required for the
test. All interfaces will not be used
for each test, please see Section 5 of this test procedure for slotting
information.
1.
Eight (8) OC-12 Client Interfaces - SR or IR
2.
Two (2) OC-48 Client Interfaces - SR or IR
3.
Two (2) Gigabit Ethernet Interfaces – LX GBIC
preferred
4.
One (1) OC-192 Client Interfaces - SR or IR
Line capacity and load will vary across
configurations, please see the table below and Section 5 for detail.
Table 3.1 Configuration Line Capacities
Generally, each item in this test plan
must pass 100% of its test cases, with only minor issues, in order to pass each
test area. Each failure will be
considered independently, as particular tests are more critical to the
functioning and supporting of customer services.
It is very important that during and after EACH test case execution, the following
be monitored:
·
Traffic
on all ports
Check the traffic
on the equipment targeted by the test case, and if possible, any additional traffic
on the equipment that is not related to the test case. For instance, when performing
tests on one circuit, check the continuity of the other circuits in the shelf
to verify that no impact to traffic is observed on these unless otherwise
noted. Performance monitoring
data should also be checked.
·
Alarms/
Logs
Check at the Node’s
Alarm Monitor for correctness of the alarms. No unexpected or transient alarms
are to be generated by the system.
·
Visual
Indications/LEDs
Verify the reaction
of LEDs on the system, including circuit pack and
shelf/bay lamps, due to triggers initiated by test case steps.
Every test case
should be executed starting from a zero-alarm state.
Note that the maximum output power of many SONET
test sets is 0 dBm (1mW). To ensure that the SONET test set signal is
not excessive, the user should verify the output power from the test set and
add appropriate attenuation to match the required level between the tester Tx and the transceiver Rx. A hand held power meter can be used to measure
the input power level to the transceiver.
The receive input power dynamic range of many SONET test sets is -8dBm maximum to
-28dBm minimum. Hence, depending on the
test set used, an appropriate attenuator may be required between the SUT Tx and the test set Rx.
Most SONET test sets have built-in optical power meters allowing the
user to quickly verify whether or not the input power to the test set is within
the correct range.
At least 10 dB of attenuation should be used if
the test set is looped from Tx
to Rx.
Verify that the appropriate amount of attenuation
is used if the SUT transceiver is looped to itself or another transceiver.
Objective
This test case is intent to test the alarms reporting and
detection capability according to GR253-CORE.
Test Setup
·
Alarms free SUT environment.
·
STS3c, STS12c, or STS48c circuit test traffic is
running error free through OC48 inter-node trunk.
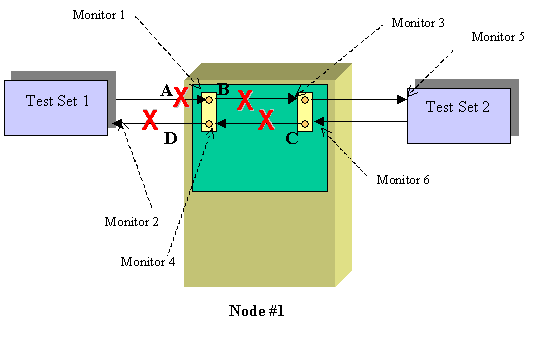
Figure
5.1.1 Fault Management Configuration
Test Procedure
1.
Verify that the Test Set 1 data pattern matches that of
the Test Set 2 data pattern.
2.
Impair the circuit at point A to D as shown in figure above.
3.
At each impairment point, record alarms detected on all
equipment. The Fault Management Test
Cases are provided in the table below (Once all test cases in the table below
have been completed, indicate in Appendix A whether or not all test cases were
compliant).
4.
Change the alarm threshold and verify that GUI reflects
appropriate alarms when errors have reached the thresholds
|
Alarm Generation/ Network Impairment
|
Monitor Point
|
Expected Alarm
Detection
|
Actual Alarm Detection
|
|
A
|
#1
|
LOS on SUT port
|
|
|
|
#2
|
Line RFI
|
|
|
|
#3
& 5
|
STS Path AIS
|
|
|
|
#4&6
|
OK
|
|
|
B
|
#1,2,6
|
OK
|
|
|
|
#3
|
LOS on trunk port
|
|
|
|
#4
|
Line RFI
|
|
|
|
#5
|
STS Path AIS
|
|
|
C
|
#1,5,6
|
OK
|
|
|
|
#2
|
STS Path AIS
|
|
|
|
#3
|
Line RFI
|
|
|
|
#4
|
LOS
|
|
|
D
|
#1
|
OK
|
|
|
|
#2
|
LOS
|
|
|
|
#3,4,5,6
|
OK
|
|
|
Test Set A Transmit Line AIS
|
#1
|
Line AIS
|
|
|
|
#2
|
Line RFI
|
|
|
|
#3
& 5
|
STS Path AIS
|
|
|
|
#4
& 6
|
OK
|
|
Table 5.1.2 Fault Management Test Cases
The following test cases will verify the reporting
capabilities of all the necessary performance monitoring statistics parameters,
history logging, and threshold setting.
Test Setup
·
Refer to the figure below for the test
configuration
·
Before the start of testing, ensure an Alarms
free SUT environment and verify that test traffic (STS3 or STS48) is running
error free.
·
Verify that the Test Set A
data pattern matches that of the Test Set B data pattern.
·
Execute all the Performance Monitoring
Statistics cases as described in the cases below.
·
For each test case, record the results in the PM
screen in the data sheets provided at the end of this section, in Appendix A.
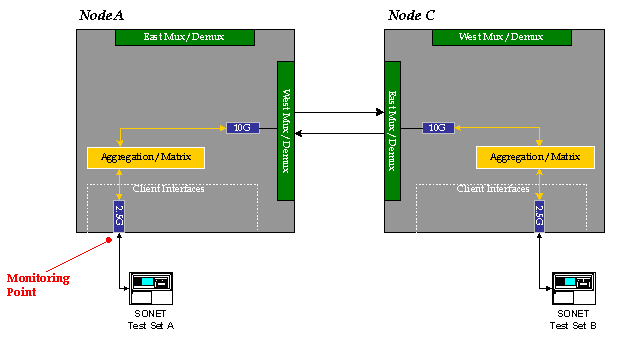
Figure 5.2.1 Performance Monitoring
Statistics Testbed
Objective
This test case will
demonstrate that the Performance Monitoring (PM) for the SUT port displays the
correct number of Near-End Section Code Violations (SectCV)
when the signal is degraded. SectCV is the count of
bit interleaved parity (BIP-8) errors detected at the section layer.
Test Setup:
·
Alarms free SUT environment and test traffic is
running error free.
·
An OC-48
SONET test set is required. PM’s are caused by injecting the appropriate signal
(e.g. B1 errors).
Test Procedure:
1.
Make sure
that the current statistics have cleared to 0.
2.
Using the
SONET test set, inject 10 Section Code Violations (B1 overhead byte) into the
OC-n signal.
3.
Verify that
the SectCV PM count for the OC-n working channel
increased by 10.
4.
Send SectCV into the OC-n signal to a BER of 1.0E-9.
5.
Verify that
the SectCV PM count for the OC-n working channel is
increasing (approximately n x 51.84Mbps x BER x 60). This will be 149.3 errors
per minute on an OC-48 Interface.
6.
Send SectCV into the OC-n signal to a BER of 1.0E-8.
7.
Verify that
the SectCV PM count for the OC-n working channel is
increasing (approximately n x 51.84Mbps x BER x 60). This will be 1,493 errors
per minute at an OC-48 Interface.
8.
Send SectCV into the OC-n to a BER of 1.0E-6. (Approximately n x
51.84Mbps x BER x 60).
9.
Verify that
the SectCV PM count for the OC-n working channel is
increasing. This will be 149,299 errors per minute at an OC-48 Interface.
10.
Re-insert
the original error free OC-n signal into the OC-n working channel.
11. Verify that all PM counts for the OC-n working
channel have stopped incrementing (after approximately 20 seconds).
Objective
This test case will
demonstrate that the Performance Monitoring (PM) for the SUT port displays the
correct number of Near-End Section Errored Seconds
(Sect ES) when the OC-n signal is degraded. Sect ES is a second during which
one or more Sect CV or one or more OOF or LOS defects occur.
Test Setup
·
Alarms free SUT environment and test traffic is
running error free.
Test Procedure:
1.
Make sure
that the current statistics have cleared to 0.
2.
Inject 10
Section Code Violations (B1 overhead byte) into the OC-n signal.
3.
Verify that
the SectES PM count for the OC-n working channel
increased by 10.
4.
Send SectCV into the OC-n signal to a BER of 1.0E-6 for 60
seconds.
5.
Verify that
the SectES PM count for the OC-n working channel is
increased by approximately the value of 60.
6.
Send LOF
alarm into the OC-n signal for 60 seconds.
7.
Verify that
the SectES PM count for the OC-n working channel is
increased by approximately the value of 60.
8.
Send LOS
alarm into the OC-n signal for 60 seconds.
9.
Verify that
the SectES PM count for the OC-n working channel is
increased by approximately the value of 60.
10.
Re-insert
the original error free OC-n signal into the OC-n signal.
11. Verify that the SectES
PM count for the OC-n working channel has stopped incrementing (after
approximately 20 seconds).
Objective
This test case will
demonstrate that the Performance Monitoring (PM) for the SUT port displays the
correct number of Near-End Section Severely Errored
Seconds (Sect SES) when the OC-n signal is degraded. Sect SES is the count of
one-second intervals containing 2392 or more Sect CVs or one or more LOF or LOS
defects.
Test Setup
·
Alarms free SUT environment and test traffic is
running error free.
Test Procedure:
1.
Make sure
that the current statistics have cleared to 0.
2.
Send SectCV into the OC-n signal to a BER of 1.0E-5 for 60
seconds.
3.
Verify that
the SectSES PM count for the OC-n working channel is
increased by approximately the value of 60.
4.
Send LOF alarm
into the OC-n signal for 60 seconds.
5.
Verify that
the SectSES PM count for the OC-n working channel is
increased by approximately the value of 60.
6.
Send LOS
alarm into the OC-n signal for 60 seconds.
7.
Verify that
the SectES PM count for the OC-n working channel is
increased by approximately the value of 60.
8.
Re-insert
the original error free OC-n signal into the OC-n signal.
9.
Verify that
all PM counts for the OC-n working channel have stopped incrementing after
approximately 20 seconds.
Objective
This test case will
demonstrate that the Performance Monitoring (PM) for an SUT port displays the
correct number of Near-End Section Severely Errored
Frame Seconds (Sect SEFS) when the OC-n signal is degraded. Sect SEFS is a
count of one-second intervals containing one or more LOF (Loss of Frame)
events.
Test Setup
·
Alarms free SUT environment and test traffic is
running error free.
Test Procedure:
1.
Make sure
that the current statistics have cleared to 0.
2.
Create a LOF
(Loss of Frame) for 1 second.
3.
Verify that
the SectSEFS PM count for the OC-n working channel
has increased by 1.
4.
Create a
permanent LOF (Loss of Frame) for 60 seconds.
5.
Verify that
the SectSEFS PM count for the OC-n working channel is
increased by approximately the value of 60.
6.
Re-insert
the original error free OC-n signal into the OC-n signal.
7.
Verify that
all PM counts for the OC-n working channel have stopped incrementing after
approximately 20 seconds.
Objective
This test case will
demonstrate that the Performance Monitoring (PM) for SUT port displays the
correct number of Line Code Violations (Line CV) when the OC-n signal is
degraded..
A Near-End Line CV is
the count of bit interleaved parity (BIP-8) errors detected at the line layer.
Test Setup
·
Alarms free SUT environment and test traffic is
running error free.
·
PM’s are
caused by injecting the appropriate signal (e.g. CV) using test set A.
Test Procedure:
1.
Make sure
that the current statistics have cleared to 0.
2.
Inject 10
Line Code Violations (B2 overhead byte) into the OC-n signal.
3.
Verify that
the Near-End Line CV PM count for the OC-n working channel have increased to
10.
4.
Send Line
Code Violations (B2 overhead byte) into the OC-n signal at a BER of 1.0E-9.
5.
Verify that
the Near-End LineCV PM count for the OC-n working
channel is increasing (approximately n x 51.84Mbps x BER x 60). This will be
149.3 errors per minute on an OC-48 Interface.
6.
Send Line CV
into the OC-n signal at a BER of 1.0E-8.
7.
Verify that
the Near-End LineCV PM count for the OC-n working
channel is increasing (approximately n x 51.84Mbps x BER x 60). This will be
1,493 errors per minute on an OC-48 Interface.
8.
Send Line CV
into the OC-n signal at the near-end NE, to a BER of 1.0E-6.
9.
Verify that
the Near-End LineCV PM count for the OC-n working
channel is increasing (approximately n x 51.84Mbps x BER x 60). This will be
149,299 errors per minute on an OC-48 Interface.
10.
Re-insert
the original error free OC-n signal into the OC-n working channel.
11.
Verify that
all PM counts for the OC-n working channel have stopped incrementing after
approximately 20 seconds.
Objective
This test case will
demonstrate that the Performance Monitoring (PM) for the SUT port displays the
correct number of Line Errored Seconds (Line ES) when
the OC-n signal is degraded
Test Setup
·
Alarms free SUT environment and test traffic is
running error free.
Test Procedure:
1.
Make sure
that the current statistics have cleared to 0.
2.
Inject 10
Line Code Violations (B2 overhead byte) into the SUT port.
3.
Verify that
the Near-End LineES PM count for the port has
increased by 10.
4.
Send Line
Code Violations (B2 overhead byte) into the SUT port at the near-end NE, to a
BER of 1.0E-6 for 60 seconds.
5.
Verify that
the Near-End LineES PM count for the SUT port is
increased by approximately the value of 60.
6.
Re-insert
the original error free signal into the SUT port.
7.
Verify that
all PM counts for the Near End and Far End have stopped incrementing after
approximately 20 seconds.
Objective
This test case will
demonstrate that the Performance Monitoring (PM) for SUT port displays the
correct number of Line Severely Errored Seconds (Line
SES) when the signal is degraded.
A Near-End Line SES is a
count of one-second intervals containing 2459 or more Line CV or AIS-L is
detected. If more than 10 consecutive LineSES occur, LineSES is not counted and only LineUAS
increments. During unavailable time, only UAS and FC are incremented. (The Line
CV count is suppressed during Line SES for SES-L caused by LOS, LOF, or AIS-L.)
Test Setup
·
Alarms free SUT environment and test traffic is
running error free.
Test Procedure:
1.
Make sure
that the current statistics have cleared to 0.
2.
Send Line CV
into the SUT port at the near-end NE, to a BER of 1.0E-4 for 5 seconds.
3.
Verify that
the Near-End LineSES PM count for the SUT port is
increased by approximately the value of 5.
4.
Continuously
send LOS into the SUT port for 5 seconds.
5.
Verify that
the Near-End LineSES PM count for the SUT port is
increased by approximately the value of 5.
6.
Continuously
send LOF into the SUT port for 5 seconds.
7.
Verify that
the Near-End LineSES PM count for the SUT port is
increased by approximately the value of 5.
8.
Continuously
send AIS-L into the SUT port for 5 seconds.
9.
Verify that
the Near-End LineSES PM count for the SUT port is
increased by approximately the value of 5.
10.
Re-insert
the original error free signal into the SUT port.
11.
Verify that
all PM counts for the Near End have stopped incrementing after approximately 20
seconds.
Objective
This test case will
demonstrate that the Performance Monitoring (PM) for SUT port displays the
correct number of Line Unavailable Seconds (LineUAS)
when the signal is degraded.
A Near-End Line
Unavailable Second is a count of one-second intervals when the Line has become
unavailable. A line is considered unavailable at the onset of 10 consecutive
seconds that qualify as severely errored seconds’
line and continues to be unavailable until the onset of 10 consecutive seconds
that do not qualify as severely errored seconds.
Test Setup
·
Alarms free SUT environment and test traffic is
running error free.
Test Procedure:
1.
Make sure
that the current statistics have cleared to 0.
2.
Send Line CV
into the SUT port at the near-end NE, to a BER of 1.0E-4 for 15 seconds.
3.
Verify that
the Near-End LineUAS PM count for the SUT port is
increased by approximately the value of 15.
4.
Continuously
send LOS into the SUT port for 15 seconds.
5.
Verify that
the Near-End LineUAS PM count for the SUT port is
increased by approximately the value of 15.
6.
Continuously
send LOF into the SUT port for 15 seconds.
7.
Verify that
the Near-End LineUAS PM count for the SUT port is
increased by approximately the value of 15.
8.
Continuously
send AIS-L into the SUT port for 15 seconds.
9.
Verify that
the Near-End LineUAS PM count for the SUT port is
increased by approximately the value of 15.
10.
Re-insert
the original error free signal into the SUT port.
11.
Verify that
all PM counts for the Near End have stopped incrementing after approximately 20
seconds.
Objective
This test case will
demonstrate that the Performance Monitoring (PM) for SUT port displays the
correct number of Line Failure Counts (Line FC). The FC counts are incremented
when a facility alarm is raised on a previously alarm-free facility. The counts
will not increment if additional alarms appear before the original alarm is
cleared.
A Near-End Line FC is a
count of line failures i.e. transitions of the line into the failed state
(caused by line failure (AIS, LOF, LOS) events).
Test Setup
·
Alarms free SUT environment and test traffic is
running error free.
Test Procedure:
1.
Make sure
that the current statistics have cleared to 0.
2.
Create LOS
on the SUT port.
3.
Verify that
the Near-End LineFC parameter has incremented.
4.
Remove the
LOS and add LOS again before the alarm has had a chance to clear.
5.
Verify that
the LineFC parameter is not increasing. This
demonstrates that the counts will not increment if additional alarms appear
before the original alarm is cleared.
6.
Clear the
LOS.
7.
Continuously
send LOF into the SUT port for 15 seconds.
8.
Verify that
the Near-End LineFC parameter has incremented.
9.
Clear the
LOF.
10.
Continuously
send AIS-L into the SUT port for 15 seconds.
11.
Verify that
the Near-End LineFC parameter has incremented.
12.
Clear the
AIS-L.
13.
Verify that
the Near-End LineFC parameter has incremented.
Objective
This test case will
demonstrate that the Performance Monitoring (PM) for SUT port displays the
correct number of Far End Line Code Violations (Line CV) when the OC-n signal
is degraded.
A Far-End Line CV is the
count of bit interleaved parity (BIP-8) errors detected at the line layer by
the Far End NE and reported back to the Near End NE via the REI-L indicators in
the Line Overhead.
Test Setup
·
Alarms free SUT environment and test traffic is
running error free.
·
PMs are caused by
injecting the appropriate signal (e.g. FEBE) using test set A.
Test Procedure:
1.
Make sure
that the current statistics have cleared to 0.
2.
Inject 10
Line Far End Bit Errors (REI-L overhead byte) into the OC-n signal.
3.
Verify that
the Far-End Line CV PM count for the OC-n working channel have increased to 10.
4.
Send Line
Far End Bit Errors into the OC-n signal at a FEBER of 1.0E-9. This will be
149.3 errors per minute on an OC-48 Interface.
5.
Verify that
the Far-End LineCV PM count for the OC-n working channel
is increasing (approximately n x 51.84Mbps x BER x 60).
6.
Send Line
Far End Bit Errors into the OC-n signal at a FEBER of 1.0E-8.
7.
Verify that
the Far-End LineCV PM count for the OC-n working
channel is increasing (approximately n x 51.84Mbps x BER x 60). This will be
1,493 errors per minute on an OC-48 Interface.
8.
Send Line
Far End Bit Errors into the OC-n signal at a FEBER of 1.0E-6.
9.
Verify that
the Far-End LineCV PM count for the OC-n working
channel is increasing (approximately n x 51.84Mbps x BER x 60). This will be
149,299 errors per minute on an OC-48 Interface.
10.
Re-insert
the original error free OC-n signal into the OC-n working channel.
11.
Verify that
all PM counts for the OC-n working channel have stopped incrementing after
approximately 20 seconds.
Objective
This test case will
demonstrate that the Performance Monitoring (PM) for the SUT port displays the
correct number of Far End Line Errored Seconds (Line
ES) when the OC-n signal is degraded.
Test Setup
·
Setup as in Figure 9.6-1
·
Alarms free SUT environment and test traffic is
running error free.
Test Procedure:
1.
Make sure
that the current statistics have cleared to 0.
2.
Inject 10
Line Far End Bit Errors (REI-L overhead byte) into the SUT port.
3.
Verify that
the Far-End LineES PM count for the port has
increased by 10.
4.
Send Line
Far End Bit Errors into the SUT port at the far-end NE, to a FEBER of 1.0E-6
for 60 seconds.
5.
Verify that
the Far-End LineES PM count for the SUT port is
increased by approximately the value of 60.
6.
Re-insert
the original error free signal into the SUT port.
7.
Verify that
all PM counts for the Far End have stopped incrementing after approximately 20
seconds.
Objective
This test case will
demonstrate that the Performance Monitoring (PM) for SUT port displays the
correct number of Line Severely Errored Seconds (Line
SES) when the signal is degraded. A Far-End Line SES is a count of one-second
intervals containing 2459 or more Line BIP errors were reported by the far-end
LTE or an RDI-L defect was present. If more than 10 consecutive LineSES occur, LineSES is not
counted and only LineUAS increments. During
unavailable time, only UAS and FC are incremented. (The Line CV count is suppressed
during Line SES for SES-L caused by RDI-L.)
Test Setup
·
Alarms free SUT environment and test traffic is
running error free.
Test Procedure:
1.
Make sure
that the current statistics have cleared to 0.
2.
Send Line
Far End Bit Errors into the SUT port at a FEBER of 1.0E-4 for 5 seconds.
3.
Verify that
the Far-End LineSES PM count for the SUT port is
increased by approximately the value of 5.
4.
Continuously
send RDI-L into the SUT port for 5 seconds.
5.
Verify that
the Near-End LineSES PM count for the SUT port is increased
by approximately the value of 5.
6.
Re-insert
the original error free signal into the SUT port.
7.
Verify that
all PM counts for the Near End and Far End have stopped incrementing after
approximately 20 seconds.
Objective
This test case will
demonstrate that the Performance Monitoring (PM) for SUT port displays the
correct number of Line Unavailable Seconds (LineUAS)
when the signal is degraded. A Far-End Line SES is a count of seconds during
which the Line is considered unavailable at the far end. A line is considered
unavailable at the far end at the onset of 10 consecutive seconds that qualify
as SES-LFEs, and continues to be considered
unavailable until the onset of 10 consecutive seconds that do not qualify as
SES-LFEs. During unavailable time, only UAS and FC
are incremented. (The Line CV count is suppressed during Line SES for SES-L
caused by RDI-L.)
Test Setup
·
Alarms free SUT environment and test traffic is
running error free.
Test Procedure:
1.
Make sure
that the current statistics have cleared to 0.
2.
Send Line
Far End Bit Errors into the SUT port at the near-end NE, to a FEBER of 1.0E-4
for 15 seconds.
3.
Verify that
the Far-End LineUAS PM count for the SUT port is
increased by approximately the value of 15.
4.
Continuously
send RDI-L into the SUT port for 15 seconds.
5.
Verify that
the Near-End LineSES PM count for the SUT port is
increased by approximately the value of 15.
6.
Re-insert
the original error free signal into the SUT port.
7.
Verify that
all PM counts for the Near End and Far End have stopped incrementing after
approximately 20 seconds.
Objective
This test case will
demonstrate that the Performance Monitoring (PM) for SUT port displays the
correct number of Line Failure Counts (Line FC). The FC counts are incremented
when a facility alarm is raised on a previously alarm-free facility. The counts
will not increment if additional alarms appear before the original alarm is
cleared.
A Far-End Line FC is a
count of Remote Fail Indicators – Line Failures i.e. transitions of the line
into the failed state (caused by line failure (RFI-L) events).
Test Setup
·
Alarms free SUT environment and test traffic is
running error free.
Test Procedure:
1.
Make sure
that the current statistics have cleared to 0.
2.
Create RDI-L
on the SUT port.
3.
Verify that
the Far-End LineFC parameter has incremented.
4.
Remove the
RDI-L and add RDI-L again before the alarm has had a chance to clear.
5.
Verify that
the Far-End LineFC parameter is not increasing. This
demonstrates that the counts will not increment if additional alarms appear
before the original alarm is cleared.
6.
Clear the
RDI-L.
Objective
This test case will
demonstrate that the Performance Monitoring (PM) history counts for the SUT
port are correctly updated with the error counts that occurred in the previous
15 minutes. (History counts for previous 32 15-minute intervals and previous 1 days are available.)
The history counts will
be demonstrated for the following parameters: SectCV,
SectES, SectSES, SectSEFS, LineCV, LineES, LineSES, LineUAS, and LineFC for both Near and Far ends
Test Setup
·
Alarms free SUT environment and test traffic is
running error free.
Test Procedure:
1.
Make sure that
the current statistics have cleared to 0.
2.
Using the
test set, generate the different errors noted below for both Near End and Far
End onto the SUT port.
3.
Verify that
the PM counts for the SUT port have increased for the current 15-min interval.
4.
Record the
values displayed for both NEND and FEND SectCV, SectES, SectSES, SectSEFS, LineCV, LineES, LineSES, LineUAS, and LineFC.
5.
Open the
performance monitoring (PM) statistics screen for the SUT port on the far-end.
Verify that the Far-End LineFC PM count displays the
same values.
6.
Wait 15
minutes to allow the current timed counts to move into the last 15-min counts.
7.
Verify that
all the performance history parameters as mentioned above are displays in the
first 15-min interval count.
8.
Open the
performance monitoring (PM) statistics screen for the SUT port on the far-end.
Objective
This test case will
demonstrate that the Near-End Section Performance Monitoring (PM) thresholds
can be changed for SUT port.
Test Setup
Alarms free SUT environment and test traffic is running
error free.
Test Procedure:
1.
Edit the
Threshold Values for CV to 16383, ES to 10, SES to 10
and SEFS to 10.
2.
Verify that
the CV is set to 16383, ES is set to 10, SES is set to 10 SEFS is set to 10.
Objective
This test case will
demonstrate that the Near-End and Far-End Line Performance Monitoring (PM)
thresholds can be changed for SUT port.
Test Setup
·
Alarms free SUT environment and test traffic is
running error free.
Test Procedure:
1.
Edit the
Values for Near End CV to 16383, Near End ES to 10, Near End SES to 10 Near End UAS and Near End FC to 3.
2.
Edit the
Values for Far End CV to 16383, Far End ES to 10, Far End SES to 10 Far End UAS
and Far End FC to 3.
3.
Verify the
Values for Near End CV to 16383, Near End ES to 10, Near End SES to 10 Near End UAS and Near End FC to 3.
4.
Verify the
Values for Far End CV to 16383, Far End ES to 10, Far End SES to 10 Far End UAS
and Far End FC to 3.
Objective
The goal of this test is to gauge the ease of operation and
service velocity capabilities of the system.
This test should be run after the operators have become reasonably
familiar with the system.
Procedure
Using the instructions provided by the Vendor on circuit turn-up record
the following characteristics for provisioning a circuit:
Note: Each Provisioning
Step is defined as any mouse click, where information is sent to a node or
obtained from a node to configure a new circuit across the given System Under Test (SUT).
A. Determine
the number of steps necessary to provision a new circuit through three nodes of
a live system.
(10) 1-5
(5) 6-10
(4) 11-15
(3) 16-20
(2) 21-30
(0) Over 30 steps
The Time will recorded by a conventional
watch with second hand or digital watch.
The Provisioning Time
measurement will be recorded three times and averaged only after running
through the procedure three times.
B. Determine
the length of time necessary to provision a new circuit through three nodes of
a live system.
(10) 1-5 minutes
(5) 6-10 minutes
(4) 11-15 minutes
(3) 16-20 minutes
(2) 21-30 minutes
(0) Over an hour
Note any System
Adjustments that must be made to realize a stable system when a new
circuit/channel is added to the SUT or maintain a stable system when a
circuit/channel is deleted from the SUT.
This characteristic measurement is directed at, but not limited to,
optical channel adjustments.
C. Note
the characterization that best describes the need for System Adjustment for the
SUT.
(10) No Need to re-equalize system
(5) Ability to automatically re-equalize channels
(0) Need to manually re-equalize
channels
Whenever a new circuit is added or deleted, Traffic running on any other channels
should not be affected. No errors or
alarms should appear on any other working circuit as a result of a circuit
being added or deleted.
D. Traffic
(5) Non-Traffic affecting addition
(0) Traffic affecting addition
E. Overall measurement of Provisioning
capability
The sum of the numbers recorded in Steps A, B, C, and D are
the grade given for the SUT.
Objective
The goal of this test case is to verify that the system is
able to carry a substantial traffic load of varying line rates across a
reasonable distance for extended period of time. The test verifies system stability, design
accuracy, and overall performance in a true network situation.
 Figure
5.4.1 Long Term BER Test Bed
Figure
5.4.1 Long Term BER Test Bed
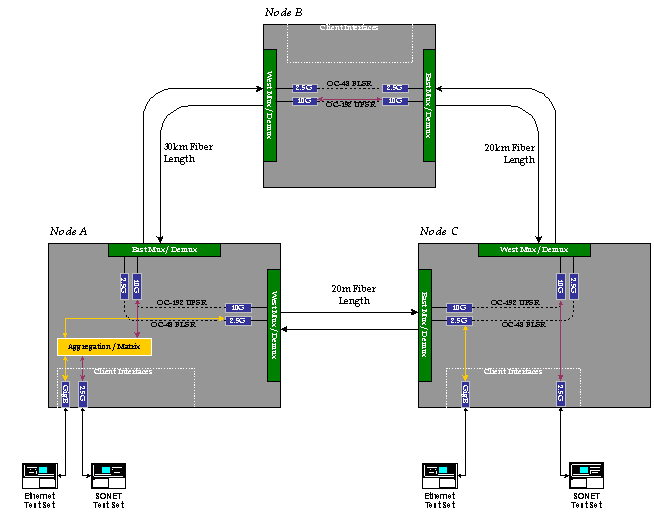
Required Equipment.
·
To ensure correct operation, three nodes are
required. Node B, the intermediate
bypass node, is in place to test the OADM capability of the system. Access to each wavelength should be available
at Node B, however it is not required to have
transponder interfaces in the node.
·
Four testers are required, three SONET test sets
and one Ethernet test set.
·
Each test circuit will traverse the 50km segment
several times as denoted by the color codes above.
Test Procedure:
- Configure
the network as shown in the network above.
- Consolidate
the GigE and OC-12 traffic onto a single 2.5G
network channel for transport.
- Balance
the system and verify traffic is running error free on each test set.
- Run
the system for 72 consecutive hours without disruption or reconfiguration of the system.
Objective
The goal of this series of test cases is to verify the 1:N and 1+1 Linear Automatic Protection Switching (APS)
functions of the Switch system. This
testing includes 1:N, n≤14 and 1+1. Client side interfaces will be tested in
these cases.
All protection switching procedures, whether initiated
manually or automatically, should occur within a 50ms period. To verify, service disruption times should be
<50ms for manually initiated switches and <60ms for failure-induced
cases.
Figure 4.1 Linear APS Test Bed
Required Equipment.
·
To ensure correct operation, two nodes are
required. It is possible for APS testing
to be performed on a single Switch, but valid performance measurements may not
be achieved.
·
The working and protect client ports should be
housed in diverse card slots.
·
Two SONET testers are required.
·
The default setup with two nodes is shown in the
figure above.
Test Procedure:
Execute all the Redundancy/APS test cases as specified
below. All test cases should be
performed at least 3 times in order to capture the average switching time from
the test set. Protection switching time
should be less that 50ms.
For each test step, verify that the appropriate
alarms/messages pop-up, and proper visual indicators on Element Management System (GUI) are displayed. Report all the anomalies.
Test Configuration of APS Groups and Lines
The user should
configure APS protection groups using GUI. The tests shall be done by
configuring cross connects between ports of the data path.
1.
The APS
group should be considered functional only when the protect line has been
enabled to send and receive K1-K2 bytes.
2.
The user
should be able to add and remove lines from the APS protection group as long as
there is no switch currently active.
3.
If a line is
being added to a protection group or being removed from a protection group, it
should not affect the traffic on the line.
4.
If a protect
line is removed from a group, the far end should detect that the protection
line is not correctly configured and disable the protect line.
Test Cases:
The test cases for
Linear APS testing are provided in the table below. The data sheets for the test cases are
provided in Appendix A.
|
Section
|
APS Test Cases
|
|
5.5.1
|
Auto Protection Switch
|
|
5.5.2
|
1:N K1/K2
|
|
5.5.3
|
1+1 K1/K2
|
|
5.5.4
|
Lockout of Protect
|
|
5.5.5
|
Revertive / Non-Revertive
|
|
5.5.6
|
Unidirectional APS
|
|
5.5.7
|
Protect Switching Priorities
|
|
5.5.8
|
Circuit Creation
|
Table 5.5.2 SUT OC-12 APS Test Results
1.
A failure (LOS, SF, SD, AIS-L)
causes a protection switch.
2.
Removal of the active Interface causes a protection
switch.
3.
The signal degrade test should be performed with a
known BER source, such as a test set in the “THRU” mode.
4.
Exceeding
preset BER threshold will cause a protection switch. . The BER used to generate
the degradation should be set for various values and checked.
5.
The signal
degrade should clear per Table 5-3 of BellCore GR-253
“Clearing Time Criteria for BER based SF and SD Conditions”
6.
A manual switch and
force switch causes a protection switch.
Manual switch can be performed from GUI.
7.
Ensure that a
channel mismatch on the APS line configuration results in a Signal Fail signal
on the K1-K2. This could be because of
APS mode mis-match or channel mismatch.
8.
Ensure that in a 1:N APS group, extra traffic can be configured.
9.
Verify that when an APS switch is performed, the extra
traffic on the protect line is dropped and the traffic from the working line is
protected.
10. In
the case that there is a high priority and a low priority working line
configured and both fail, verify that the high priority traffic is indeed
protected.
11. In
the case that there are more than one working lines configured, ensure that the
lower channel number is the one being protected.
12. Clear
all failures.
5.5.2
(1:N) APS
K1-K2 Byte Generation and Extra Traffic on Protect Line
The K1-K2 byte generation and bit assignment should comply
with Bellcore GR-253 standard.
1.
For the K1 byte, ensure that the first nibble reflects
the current Switch State (per Table 5-4,GR-253-CORE) and the second nibble has
either the null channel, channel 15 (if extra traffic is enabled) or channel
number being protected.
2.
For the K2 byte ensure that the
first nibble is the bridged channel number and that the second nibble reflects
the 1:N, namely bit 5 should be “1” and bits 6 through 8 should be configured as
“101” for bi-directional
The K1-K2 byte generation and bit assignment should comply
with Bellcore GR-253 standard.
1.
For the K1 byte, ensure that the first nibble reflects
the current Switch State
(per Table 5-4,GR-253-CORE) and the second nibble has
either the null channel or channel number 1.
2.
For the K2 byte ensure that the first nibble is the
bridged channel number and that the second nibble reflects the 1+1, namely bit
5 should be “0” and bits 6 through 8 should be configured as “100”for
unidirectional or 101 for bi-directional.
1.
When a lockout of
Protect is active, the traffic will not be carried on the protection
channel. The traffic will be carried on
the working channel.
2.
If Lockout
of Protect is performed while traffic is on the protection channel, the
traffic will be switched back to the working
channel.
3.
When there is a
signal failure on the working channel, the traffic will not switch to the
protection channel if the lockout of protect is active.
4.
Lockout of Protect overrides all the APS switch
commands.
5.5.5
Revertive /
Non-revertive
1.
Traffic will
not revert to the alternate port (working to protect or protect to working)
after a manual switch until user clears the switch.
2.
Traffic will
not revert to the alternate port (working to protect or protect to working)
after a forced switch until user clears the switch.
3.
Configured the APS as “revertive”
mode. Preset the WTR period. Repeat the test for different WTR period.
4.
Traffic will
revert only after the Wait-To-Restore (WTR) period is expired.
5.
Traffic will
not revert before APS switch command has been removed and the WTR time has
expired.
6.
If an
additional signal fail condition is detected while switch is in WTR, the signal
fail condition will take precedence and the WTR restarted.
7.
Traffic will not restore back to the “working
port” if the port is failed even when the WTR period has expired.
This test case is to verify the normal operations of the Uni-directional switch capabilities for the 1+1 APS
configuration. Unidirectional switching
is not provided for the 1:N APS configuration.
1.
Configure the Working and Protect LM association from
the 1+1 Association GUI screen. The configuration should be done on both nodes.
2.
Create a 1+1 group and select the desired Working line
port. The corresponding protect line will be chosen automatically.
3.
In the Group tab window of the Protection Screen,
select the configuration to be Unidirectional, and the non-revertive.
4.
Place the THRU mode test set in the Protect line.
5.
Enable the working and protect lines of the APS 1+1
group.
6.
On the THRU mode verify that the K1-K2 indicate the Uni-directional configuration. K2 lower nibble should
read “0100” indicating a “0” in the 5th bit position to indicate a
1+1 configuration and “100” to indicate unidirectional.
7.
Fail the working line in one direction, and verify that
the switch is signaled in only one direction.
8.
Fail the reverse direction and ensure that the switch
in the reverse direction is also working.
9.
Clear all failures and ensure that the lines are
restored but that the data traffic still remains on the protect line.
10. From
the protection window administer LOCKOUT of protection on the protect
line. This action should force the data
to be routed over the working lines.
11. Clear
LOCKOUT command.
This test case will
verify the protection switching priorities for SUT port. The priority levels
from highest to lowest are as follows (for bi-directional switching in phase 1,
phase 2 will cover uni-directional switching):
|
Bit
(1234)
|
Automatically
Initiated, External, or State Request (Note 1)
|
|

Lock
Out of Protect commanded by operator
|
|
1111
|
Lockout of Protection
|
|
1110
|
Forced Switch (see
Note 1)
|
|
1101
|
SF - High Priority
(Note 2)
|
|
1100
|
SF - Low Priority
|
|
1011
|
SD - High Priority
(Note 2)
|
|
1010
|
SD - Low Priority
|
|
1001
|
(not used)
|
|
1000
|
Manual Switch
|
|
0111
|
(not used)
|
|
0110
|
Wait-to-Restore (Note
3)
|
|
0101
|
(not used)
|
|
0100
|
Exercise (Note 4)
|
|
0011
|
(not used)
|
|
0010
|
Reverse Request (Note
5)
|
|
0001
|
Do Not Revert (Note 6)
|
|
0000
|
No Request
|
Table 5.5.7.1 Linear APS K1 Byte, Bits 1 through 4
BellCore GR-253-Core rev 2, Jan 1999, R5-58 [179] - Table 5-4.
Notes:
1.
Request
priority is in descending order, except that an SF request by the null channel
(for an SF condition detected on the protection line) has a higher priority
than a Forced Switch (i.e., it is between Lockout of Protection and Forced
Switch).
2.
High
Priority codes apply only to the 1:n architecture.
3.
1+1 LTE
provisioned for non-revertive switching does not
transmit Wait-to-Restore.
4.
Exercise may
not be applicable in some linear APS systems.
5.
Reverse
Request applies only to bi-directional systems.
6.
Only 1+1 LTE
provisioned for non-revertive switching transmits Do
Not Revert.
1.
Verify that
a Cross Connect circuits can be created while the SUT port is switched to
protect channel and are valid and traffic is passing without any problems. Note: For the line to be configured and
traffic to be carried, the CTP has to be on the working line.
2.
Verify that
upon the working line being restored the cross-connect circuit continues to
pass traffic without any problems.
This section of the test plan provides information on how to
test the Bi-directional Line Switched Ring (BLSR), or equivalent, feature of
the node and ensuring that the performance is compliant with the standard 4
fiber BLSR operations. The primary
requirements for the BLSR are described in Telcordia
GR-1230 (4 Fiber BLSR).
The primary requirements for the BLSR feature are:
|
Telcordia Specifications
|
Description
|
|
GR253 R5-42, R5-38, GR1230 6.2.1.2.
|
The system should detect LOS, LOF, and AIS-L and initiate
an RPS in within 10ms
|
|
GR253 R5-44
|
The system should detect BER SF and initiate an RPS in a
time that specified by the appropriate curve in GR253 Figure 5-5.
|
|
GR-1230 R6-13, R6-14
|
In a clean ring, the end-to-end switch completion time
should not exceed 50ms. In any other situation, the end to end switch
completion time should not exceed 100ms
|
|
GR1230 3.2 and 3.4
|
In case there is extra traffic running on the protect
channel, the extra traffic should be pre-empted and be squelched before the
automatic protection switching. AIS-P is inserted on the squelched time slot
in order to prevent traffic misconnection
|
Table 5.6.1 Telcordia Specification Description
The following sections outline the description for testing
the BLSR feature. It is assumed that for
initial lab trial testing the number of nodes will be limited to three and that
all the ring functionality can be tested.
Figure 5.6.1 BLSR/UPSR Test Cases Test bed
A hard failure (LOS, LOF, SF, SD, and AIS-L) will cause a
protection switch. Removal of the active Interface causes a protection
switch. In the first case the protection
switch will result in a SPAN switch, where the protect line is carrying
traffic. If the protect line should also
fail, then a ring switch will carry the traffic around the configured ring to
the destination node.
The signal degrade test should be performed with a known BER
source, such as a test set in the “THRU” mode.
Exceed preset BER thresholds will
cause a protection switch. The BER used to generate the degradation should be
set for various values and checked. The
signal degrade should clear per Table 5-3 of BellCore
GR-253 “Clearing Time Criteria for BER based SF and SD Conditions”
Test Procedure:
1.
Configure
the BLSR Ring as in the figure above. Verify the Cross-connect is setup from Node A East Working through Node B and to Node
C West Working.
2.
Insert a LOS
into the working line (pull working fiber). From test set 2 verify the span
switch completed within the specified 60 ms. From the
GUI verify the span switch between nodes A & B.
3.
Fail the
protect line between nodes A & B (Interface removal or Attenuation). From
test set 2 verify the ring switch completed within the specified 60 ms. From the GUI verify the ring switch between nodes A
& B.
4.
Recover the
BLSR protect line and wait for the wait to restore period to expire. Verify the system DOES NOT restore to a span
switch (traffic is carried by the ring switch).
5.
Recover the
BLSR working line and wait for the wait to restore period to expire. Verify from GUI that the status of the line
is wait to restore during the period. Verify the system restores from the ring
switch.
6.
Repeat these
steps for the following working line failures: LOF, SF, SD, AIS-L, and
transceiver module removal. For Signal
degrade and Signal fail the switch and recovery times should match the graphs Figure 5-5 of BellCore
GR-253. Example: SD 1x10⁻⁶ (default on NE) switch time should be less than
112.5 ms.
The following switches
(in-band, using K1/K2 bytes to communicate between NE's) can be performed from
the GUI Interface:
·
Manual-Span,
·
Manual-Ring,
·
Force-Span,
·
Force-Ring,
and
·
Lockout of
Protection-Span.
The following switch
commands (out-of-band, sent to all NE’s via DCC) can also be performed from
GUI:
·
Lockout of
working channels-Ring,
·
Lockout of
working channels-Span,
·
Lockout of
Protection – all spans and clear
Manual Exerciser Ring
and Span commands can also be run from the GUI interface. The exerciser tests the switch functions of
the NE without causing a protection switch.
Test Procedure:
1.
From the GUI
interface perform a Manual Span switch to protection, between Nodes A & C. Verify the
switch time from test set 1. Verify
the manual Span switch status from the GUI interface.
2.
From test set 2 insert a LOS on the working line.
Verify the traffic on test set 1 is not interrupted. Verify the switch status changes to auto
switch.
3.
Clear the LOS on test set 2. From GUI verify the switch status of Wait to Restore and not the user commanded Manual switch. Verify NE restores at the end of the wait to
restore period.
4.
From the GUI
interface perform a Manual Ring switch, between nodes A & B. Verify the switch time from test set 1. Verify the Manual Ring switch status
from the GUI interface.
5.
From test set 2 insert a LOS on the working line.
Verify the traffic on test set 1 is not interrupted. Verify the switch status changes to auto
switch.
6.
Clear the LOS on test set 2. From GUI verify the switch status of Wait to
Restore. Verify NE restores at the end
of the wait to restore period.
Test Procedure:
1.
From the GUI
interface perform a Force Span switch to protection, between nodes A &
B. Verify the switch time from test set
2. Verify the Force Span switch
status from the GUI interface.
2.
From test set 2 insert a LOS on the working line.
Verify the traffic on test set 1 is not interrupted. Verify the switch status does not change.
(FORCE switch is higher priority that Signal Fail.)
3.
Clear the LOS on test set 2. From GUI perform a clear command. Verify the
system reverts back to working. Verify
the switch status of No request. Verify the revert time on test set 1.
4.
From the GUI
interface perform a Force Ring switch, between Nodes A
& B. Verify the switch time from
test set 1. Verify the Forced
Ring switch status from the GUI interface.
5.
Fail both the working and protect lines between nodes A
& B. Verify the traffic on test set 1 is not interrupted. Verify the switch status does not change from
Forced Ring.
6.
Recover both lines (W&P) and perform a clear
command via GUI. From GUI verify the
switch status of No request. Verify
restore time from test set 1.
Test Procedure:
1.
From the GUI
interface perform a Force Span switch to protection, between nodes A &
B. Verify the switch time from test set
2. Verify the Force Span switch
status from the GUI interface.
2.
From the GUI interface perform a lockout of Protection
Span, between Nodes A & B. Verify the system reverts back to working; by
verifying the switch time on the test set 1.
From GUI verify the switch status has changed to Lockout of Protection
Span.
3.
From test set 2 insert a LOS on the working line.
Verify the traffic on test set 1 has a AIS-P. Verify the switch status does not
change.
4.
From the GUI interface perform a clear command. Verify the traffic switches to protection and
AIS-P clears from test set 1. Verify the
switch status changes to Auto.
5.
Clear the LOS on test set 2. Verify the system reverts
back to working. Verify the switch
status of No request. Verify the revert time on test set 1.
6.
Repeat the previous steps using the Lockout of
Protection-all span command instead of the Lockout of Protect-Span command.
7.
From a No Request Ring state, perform a span switch
between Nodes 2 & 3. Verify the span
switch via test set 1 and GUI.
8.
Perform a Lockout of Protection-Span between nodes A
& B. Verify traffic is not
interrupted on test set 1.
9.
From GUI perform a lockout of protection – all spans command. Verify the traffic is switched back to
working between nodes 2 & 3, by verifying the traffic hits on test set
1.
10. Fail
the protection line between Nodes A & B. Verify
traffic on test set 1 is not affected.
11. From
test set 2 insert a LOS on the working line between nodes A & B. Verify test set 1 has a
AIS-P.
12. From
GUI clear the Lockout of Protection – all Spans. Verify the system does a ring switch and the
traffic on test set 1 recovers.
13. Clear
both failures between nodes A & B.
Verify the system reverts back to the working line after the wait to
restore period has expired.
Test Procedure:
1.
From the GUI
interface perform a Lockout of working channels – ring switch, between nodes A
& B. Verify the traffic on test set
1 is not affected. Verify the
Lockout of Working Ring status from the GUI interface.
2.
Fail the working line between Nodes 2 & 3. Verify the span switch by checking the errors
on test set 1, and the switch status via GUI.
3.
Fail the protect line between Nodes 2 & 3. Verify the ring switch by checking the errors
on test set 1, and the switch status via GUI.
4.
Recover both working and protect lines between Nodes 2
& 3. Verify the system reverts back
to the working line between Nodes 2 & 3, after the WTR time has
expired.
5.
Fail the working line between Nodes A
& B. Verify the span switch by
checking the errors on test set 1, and the switch status via GUI.
6.
Fail the protect line between nodes A & B. Verify the ring switch fails by checking the
AIS-P on test set 1, and the switch status via GUI.
7.
Via GUI clear the Lockout of Working Ring command
between Nodes A & B. Verify the system does a ring
switch and that the traffic recovers.
8.
Recover both working and protect lines between Nodes A & B. Verify the
system reverts back to the working line between Nodes 1 & 2, after the WTR time has
expired.
9.
From the GUI
interface perform a Force Ring switch to protection, between nodes A &
B. Verify the switch time from test set
1. Verify the Force Span switch
status from the GUI interface.
10. From
the GUI interface perform a lockout of working Ring, between Nodes A & B. Verify the
system reverts back to working; by verifying the switch time on the test set
1. From GUI verify the switch status has
changed to Lockout of Working Ring.
11. From
GUI Clear the lockout of working ring. Verify the
traffic is not affected on test set 1.
12. From the GUI interface perform a Lockout of
working channels – span switch, between nodes A & B. Verify the traffic on test set 1 is not affected. Verify the Lockout of Working span
status from the GUI interface.
13. Fail
the working line between Nodes 2 & 3.
Verify the span switch by checking the errors on test set 1, and the
switch status via GUI.
14. Fail
the protect line between Nodes 2 & 3.
Verify the ring switch by checking the errors on test set 1, and the
switch status via GUI.
15. Recover
both working and protect lines between Nodes 2 & 3. Verify the system reverts back to the working
line between Nodes 2
& 3, after the WTR time has expired.
16. Fail
the working line between Nodes A & B. Verify the span switch fails by checking the
AIS-P on test set 1, and the switch status via GUI.
17. Fail
the protect line between nodes A & B.
Verify the ring switch by checking that the AIS-P on test set 1 clears,
and the switch status via GUI.
18. Recover
both working and protect lines between Nodes A &
B. Verify the system reverts back to the
working line between Nodes 1
& 2, after the WTR time has expired.
19. Via GUI clear the lockout of working span. Verify
traffic on test set 1 is not affected.
20. From test set 2 cause a LOF on the working
line. Verify the switch time from test
set 1. Verify the Span switch
status from the GUI interface.
21. From
the GUI interface perform a lockout of working span, between Nodes A & B. Verify the
system reverts back to working; by verifying the AIS-P on the test set 1. From GUI verify the switch status has changed
to Lockout of Working Span.
22. From
GUI Clear the lockout of working Span. Verify the traffic recovers on test set
1.
23. Recover
the protect line. Verify the No request status of the Ring.
Test Procedure:
1.
From GUI on Node 1, send a Manual Exerciser Span East
Command. From Test set 2, verify the K1 byte, first nibble changes to Exerciser
Span “0100”. Verify that GUI shows the
exerciser command as passed.
2.
From GUI on Node 1, send a Manual Exerciser Ring East
Command. From Test set 2, verify the K1 byte, first nibble changes to Exerciser
Ring “0011”. Verify that GUI shows the
exerciser command as passed.
3.
From GUI on Node 2, send a Manual Exerciser Span West
Command. From Test set 2, verify the K1 byte, first nibble changes to Reverse
Request Span “0010”. Verify that GUI
shows the exerciser command as passed.
4.
From GUI on Node 2, send a Manual Exerciser Ring West
Command. From Test set 2, verify the K1 byte, first nibble changes to Reverse
Request Ring “0001”. Verify that GUI
shows the exerciser command as passed.
The K1-K2 byte generation and bit assignment should comply
with the BellCore GR-1230 standard. The bit assignment of the K1 and K2
can be verified by placing a SONET test set in THRU mode and monitoring the
overhead RPS messaging.
Test Procedure:
1.
From Test set 2, verify the K1 byte, uses the first
nibble for the current Switch State
(per Table 6-1,GR-1230-CORE) and the second nibble has
the Destination Node ID of the neighbor Node (0000-1111 the node that will
receive that line).
2.
For the K2 byte ensure that the first nibble is the
Node ID of the NE requesting the switch, bit 5 reflects the path (short=0
long=1), and bits 6 through 8 show the status of the protect line (AIS, RDI,
Extra Traffic, Bridged and switched, Bridged, and Idle).
3.
With the ring in the No request state and test set 2’s
input from Node 1 and output to Node 2 K1 should read “00000010”. Verify that
the K2 value equals “00010000”.
4.
From the GUI interface, activate the Extra Traffic on
all the Nodes. Verify the K1 byte equals
“00000010” and the K2 equals “00010011”.
5.
Delete the existing X-connect from the working channel
and create it on the protect channel.
Verify error free traffic on test set 1.
6.
Via test set 2, fail the working line between Nodes A & B. Verify the AIS-P on test set 1. Also verify the
K1 byte equals “11000010” and the K2 byte equals
“00010010”.
7.
Clear the failure on the working line. Verify the traffic recovers after the WTR
time expires.
8.
Send a Manual Span Switch and verify that the K1 byte
reads “01110010” and K2 reads “00010010”.
9.
Clear the Manual Switch and verify that the K1 is
“00000010” and K2 is “00010011”.
10. Repeat
the command with a Forced Ring Switch and verify K1 “11010010” and K2
reads “00010010”.
11. Clear
the error and verify the K1 byte equals “00000010” and the K2
equals “00010011”.
This test case will
verify the protection switching priorities for SUT port. The priority levels
from highest to lowest are as follows
|
Bit
(1234)
|
Preemption Priority
|
|
1111
|
Lockout of Protection or Signal Fail (Protection)
|
|
1110
|
Forced Switch (Span)
|
|
1101
|
Forced Switch (Ring)
|
|
1100
|
Signal Fail (Span)
|
|
1011
|
Signal Fail (Ring)
|
|
1010
|
Signal Degrade (Protection)
|
|
1001
|
Signal Degrade (Span)
|
|
1000
|
Signal Degrade (Ring)
|
|
0111
|
Manual Switch (Span)
|
|
0110
|
Manual Switch (Ring)
|
|
0101
|
Wait-to-Restore
|
|
0100
|
Exerciser (Span)
|
|
0011
|
Exerciser (Ring)
|
|
0010
|
Reverse Request (Span)
|
|
0001
|
Reverse Request (Ring)
|
|
0000
|
No Request
|
Table 5.6.4.1 BLSR K1 Byte,
Bits 1 through 4
Notes:
(1)
Based on BellCore GR-1230-Core
Issue 3, Dec 1996, R6-72 [70] - Table 6-1
Test Procedure:
1.
Configure the BLSR
Ring as in the figure above. Verify traffic is setup through test set 1 and
that the ring is in the No Request state.
2.
From test
set 2 fail the working line between Node 1 & 2. Recover the failure and
verify the system is in wait to restore.
3.
From the
GUI, send the Exerciser Ring command to the east side of node 1. Verify the command is denied and that the K1
byte on test set 2 does not change.
4.
From the
GUI, send the Exerciser Span command to the east side of node 1. Verify the command is denied and that the K1
byte on test set 2 does not change.
5.
From the GUI
on Node 1 send a Manual Ring switch. Verify that the traffic is unaffected and
that the Ring status has changed to Manual Switch Ring.
6.
Wait for the
Wait to Restore time.
Verify that the system does not switch back to working.
7.
From the GUI
interface send a exerciser Ring and Span. Verify the
system denies the commands.
8.
From GUI
send a Manual Switch Span to the East side of Node 1. Verify the traffic is unaffected, and that
the span status changes to Manual Switch Span.
9.
From the GUI
interface send a Exerciser Ring, Exerciser Span, and a
Manual Ring Switch. Verify the system denies the commands.
10.
From test set
2 cause a signal degrade on the working line between
nodes A & B, by inserting a BER of the signal degrade threshold. Verify the span status changes to signal
degrade span.
11.
From the GUI
interface send a Exerciser Ring, Exerciser Span, a
Manual Ring, and a Manual Span Switch. Verify the system denies the commands.
12.
From test
set 2 cause a signal fail on the working line between
nodes A & B, by inserting a BER of the signal fail threshold. Verify the span status changes to signal fail
span.
13.
From the GUI
interface send a Exerciser Ring, Exerciser Span, a
Manual Ring, and a Manual Span Switch. Verify the system denies the commands.
14.
Via GUI,
send a force span switch to the east side of node 1. Verify the traffic is
unaffected, and that the span status changes to Force Switch Span.
15.
From the GUI
interface send a Exerciser Ring, Exerciser Span, a
Manual Ring, a Manual Span, and a Force Ring Switch. Verify the system denies
the commands.
16.
Fail the
protect line between nodes A & B. Verify the span status changes to
protection signal fail and the system does a ring switch.
17.
From the GUI
interface send a Exerciser Ring, Exerciser Span, a
Manual Ring, a Manual Span, a Force Ring, and a Force Span Switch. Verify the
system denies the commands.
18.
Recover the
protect line and then the working line, between nodes A & B. Verify the
system reverts back at the end of the wait to restore period. Verify the ring
is back in the No Request state.
Test Procedure:
8.
With the
Ring in a No Request state, set the wait to restore time to 12 minutes. From test set 2 cause a Span Switch by
inserting a LOF.
9.
Clear the
LOF state and wait the wait to restore period.
Verify the system switches back at the end of the period.
10.
Fail the
protect line between nodes A & B. Cause a Ring switch by inserting a AIS-L on the working line.
Recover the Protect line and then the working line. Verify the system
switches back to the working line at the end of the WTR period.
11.
From node 1
cause a span switch by removing the working east transceiver module. Verify the
switch time on test set 1. Clear the
failure by inserting the card. Change
the WTR time to 7 minutes. Verify the system reverts back to working after 12
minutes (original WTR time).
12.
From test set 2 cause a Span Switch by inserting
a SF BER on the working line. Clear the failure and verify the system reverts
back after 7 minutes.
This section of the test plan
provides information on how to test the Uni-directional Path Switched Ring (UPSR), or equivalent, feature
of the node and ensuring that the performance is compliant with the standard
UPSR operations. The primary
requirements for the UPSR are described in BellCore
GR-1400.
The following
sections outline the description for testing the UPSR feature. It is assumed that for initial lab trial
testing the number of nodes will be limited to three and that all the ring
functionality can be tested. Refer to
the figure above for node configurations.
A hard failure
(LOS, LOF, SF, SD, and AIS-L) will cause a protection switch. Removal of the
active Interface causes a protection switch.
Test Procedure:
- Configure
the UPSR Ring as in the figure above. Verify the Cross-connect is setup from Node A East through Node B and to Node C
West. Also configure the ring for
non-revertive switching.
- Insert
a LOS into the working line (pull working fiber). From test set 2 verify
the span switch completed within the specified 60 ms.
From the GUI verify the span switch between nodes A & B.
- Recover
the UPSR working line and wait for the wait to restore period to
expire. Verify the system does not
restore from the ring switch, the system remains on the protection path.
- Repeat
these steps for the following working line failures: LOF, SF, SD,
AIS-P, and transceiver module removal.
For Signal degrade and Signal fail the switch and recovery times
should match the graphs Figure 5-5 of BellCore GR-253. Example: SD 1x10⁻⁶ (default on NE)
switch time should be less than 112.5 ms.
- Also
repeat steps 1-3 for a ring configured for revertive
switching.
- Verify
that the wait to restore period is observed for each case.
The following switches (in-band, using K1/K2 bytes
to communicate between NE's) can be performed from the GUI Interface:
·
Manual
switch to Protect,
·
Manual
switch to Working,
·
Force switch
to Protect,
·
Force switch
to Working,
·
Lockout of
Protection, &
·
Clear.
Test Procedure:
- From
the GUI interface perform a Manual switch to protection, between Nodes A & B.
Verify the switch time from test set 1. Verify the manual switch status
from the GUI interface.
- Insert a LOS on the working line.
Verify the traffic on test set 1 is not interrupted.
- Clear the LOS from the working line and
verify a no request state on the nodes.
Test Procedure:
- From
the GUI interface perform a Manual switch to working, between Nodes A & C.
Verify the switch time from test set 1. Verify the manual switch status
from the GUI interface.
- Insert a LOS on the protect line.
Verify the traffic on test set 1 is not interrupted. Verify the switch status changes to auto
switch.
- Clear the LOS on the protect line and
verify a no request state on the node.
Test Procedure:
- From
the GUI interface perform a Force switch to protection, between nodes A
& B. Verify the switch time
from test set 2. Verify the
Force switch status from the GUI interface.
- Insert a LOS on the working line.
Verify the traffic on test set 1 is not interrupted. Verify the switch status does not
change. (FORCE switch is higher priority that Signal Fail.)
- Clear the LOS on the working line. From GUI perform a clear command. Verify
the system stays on the protect line.
Test Procedure:
- From
the GUI interface perform a Force switch to working, between Nodes A & C.
Verify the switch time from test set 1. Verify the force switch status
from the GUI interface.
- Insert a LOS on the protect line.
Verify the traffic on test set 1 is not interrupted. Verify the switch status does not
change. (FORCE switch is higher priority that Signal Fail.)
- Clear the LOS on the protect line. From GUI perform a clear command. Verify
the system stays on the working line.
Test Procedure:
- From
the GUI interface perform a Force switch to protection, between nodes A
& B. Verify the switch time
from test set 2. Verify the
Force switch status from the GUI interface.
- From the GUI interface perform a
lockout of Protection, between Nodes A &
B. Verify the system reverts back
to working by verifying the switch time on the test set 1. From GUI verify the switch status has
changed to Lockout of Protection Span.
- Insert an LOS on the working line.
Verify the traffic on test set 1 has an AIS-P. Verify the switch status does not
change.
- From the GUI interface perform a clear
command. Verify the traffic
switches to protection and AIS-P clears from test set 1. Verify the switch status changes to auto
switch.
- Clear the LOS on the working line.
Verify the system stays on the protection line.
This test case will verify the protection
switching priorities for SUT port. The priority levels from highest to lowest
are as follows
|
Cause for Switching
|
Priority
|
|
Lockout of Protection
|
Highest
|
|
Forced Switch
|
|
|
|
Automatic Selector
|
|
|
|
Manual Switch
|
|
|
|
Wait to Restore (Revertive)
|
Lowest
|
Table
5.7.3.1 Hierarchy of Switching Criteria
Notes:
(2)
Based on BellCore
GR-1400-Core Issue 1, Mar 1994, R6-22 - Table 6-1
Test Procedure:
- Configure
the Ring as in the figure above. Verify traffic is setup through test set
1 and that the ring is in the No Request state.
- Fail
the working line between Node A & B. Recover the
failure and verify the system is in wait to restore.
- From
the GUI on Node A send a Manual switch to working command. Verify that the
traffic is unaffected and that the status has not changed.
- From
the GUI, issue a Forced Switch to Working command. Verify traffic is dropped and AIS-P is
registered on the test set.
- Repair
the working line, and verify traffic is restored to the working line, the
test set does not report AIS.
- Issue
a Clear command from the GUI.
Verify traffic is on the working line and no switch commands are
active.
- Issue
a forced switch to protect command, and verify the switch is completed.
- Issue
a manual switch to working command and verify that traffic is not
interrupted.
- Issue
a clear command. Verify the traffic
remains on the protection line and no switch requests are active.
Test Procedure:
1.
With the
Ring in a No Request state, set the wait to restore time to 12 minutes. Cause a protection switch by failing the
working line.
2.
Repair the
line and wait the wait to restore period.
Verify the system switches back at the end of the period.
3.
Fail the
protect line between nodes A & C. Cause a switch by inserting failing the
working line.
4.
Recover the
Protect line and then subsequently the working line. Verify the system switches
back to the working line at the end of the WTR period.
- From
node 1 cause a switch by removing the working east transceiver module.
Verify the switch time on test set 1.
Clear the failure by re-inserting the card. Change the WTR time to 7 minutes. Verify
the system reverts back to working after 12 minutes (original WTR
time).
- Cause a protection switch on the
working line. Clear the failure and verify the system reverts back after 7
minutes.